OneCloud: Chrome CRM Integrator User Guide
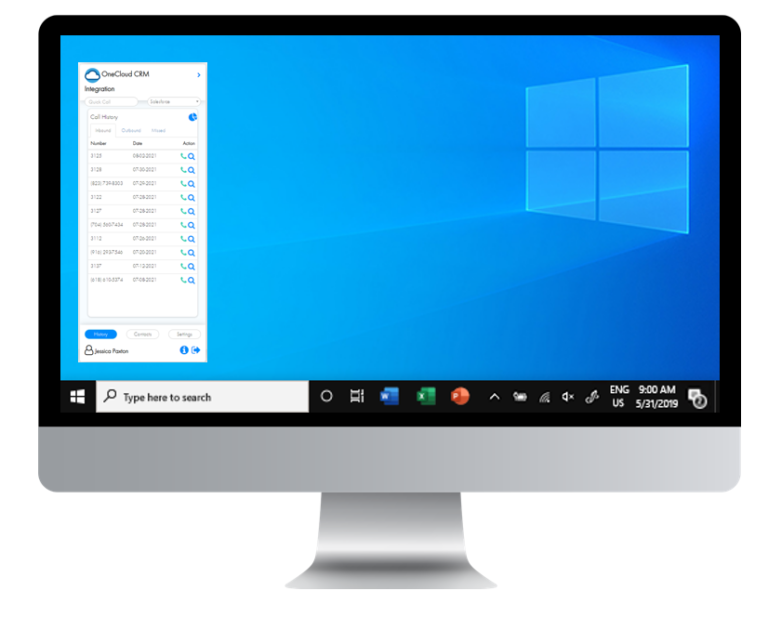
Navigation
1. Close Extension
2. Quick Call
3. Screen Pop CRM Choice – Select the appropriate CRM software (or search engine) in the top right of the application.
4. Link to OneCloud Portal – Use this icon to quickly navigate to the OneCloud portal.
5. Call History / Contacts / Settings
Click-to-Call and Information – View call history right in the Chrome extension and quickly call back or perform a screen pop via our quick action buttons.
Load your favorite contacts into the Chrome extension for easy push-button speed dialing.
6. Logout
7. Navigation Menu – Switch between History, Contacts, and Settings.
Getting Started
INSTALLING THE EXTENSION
Using the Google Chrome browser, navigate to chrome.google.com/webstore. Then “Search the store” by typing OneCloud in the search box. You will then click on the OneCloud CRM Integration application where you will be taken to a new page. Finally, you will click “Add to Chrome” in the blue box located in the top right of your screen.
Press Add to Chrome.
A pop-up will appear. Click Add Extension.
PINNING THE EXTENSION
Once installed, you will then need to navigate to the extensions by clicking the Puzzle Piece in the top right of your browser.
After clicking the Puzzle Piece, a drop-down menu will appear showing “OneCloud CRM Integration” with a clear Pin next to it.
Click the Pin (it will change to solid blue) to have the extension accessible while browsing.
LOGGING IN
Click on the OneCloud extension button in your Chrome Browser to open the extension app. A login option should appear. Use your OneCloud credentials to log in.

After entering your login information, click the Blue Right Arrow OR use the Enter Key to finish logging in.

SELECTING A CRM FOR SCREEN POPS
Select the appropriate CRM software (or search engine) in the top right of the application.
We offer over 30 pre-built integrations but if you don’t see an application, you are looking for, no problem. TelWare can add any CRM. Please reach out to TelWare for more information.
SETTINGS
Upon your first login, you’ll want to set up your CRM settings. Click on Settings to change the following Settings:
- SCREEN POPS | When enabled, a new tab will be opened in Chrome that automatically navigates to the contact in Salesforce that matches the incoming number. When disabled, a prompt is added in the Chrome notification that gives you the option of viewing the contact the Salesforce that matches the incoming number.
- CLICK TO CALL | Highlight the desired phone number in your browser, right-click on the highlighted text, and left-click the OneCloud logo to call.
- LOGO CLICK TO CALL | Simply left-click the OneCloud logo displayed on the website next to the desired number.
- LINK CLICK TO CALL | Automatically detects phone numbers and converts them to a hyperlink format. Left-click on the hyperlink to dial the desired number.
CALL LOGGING
Enabling call logging will prompt a pop-out asking the user to sign into the CRM activated. Once authenticated, they will then be prompted to allow access to communicate with the CRM.
Active Calls
PLACING A CALL
To place a call from the CRM Integration extension:
- QUICK CALL | Type a number in Quick Call and hit enter.
- PHONE ICON | Press the phone icon next to a number in the call history or the Contacts screen.
- CLICK TO CALL | When Click to Call is enabled, click on any phone number Google Chrome.
Alternatively, you can simply place a call with the device of your choice.
SALESFORCE CALL LOGGING
If call logging is enabled, upon completion of a call to an existing Contact, a new Task will show up in the Activity Feed in Salesforce showing the call. The Subject of the Task will show as “Call” and the Description will contain the details of the call. The timestamp of the call will be shown in the UTC Time zone.
RECEIVING A CALL
Upon receiving a call, the CRM Integrator will act differently depending on the features you have enabled. The key difference will rely upon the Call Pop settings. When enabled, a new tab will be opened in Chrome that automatically navigates to the contact in Salesforce that matches the incoming number. When disabled, a prompt is added in the Chrome notification, in the bottom right of your screen, that gives you the option of viewing the contact the Salesforce that matches the incoming number. The incoming call will be directed to your Softphone or Device set in your Answering Rules on OneCloud.
Related Articles
OneCloud: Analytics Wallboard Guide
Welcome to the call center analytics user guide. This article has been designed to help familiarize you with the basic layout, as well as guide you through creating an analytics board and some advanced features. Accessing the Analytics Board Note: To ...OneCloud Integrator for Windows: User Guide
Getting Started Installing the Software When you first install OneCloud Integrator, it takes you through an installation phase where you need to tell it your OneCloud Integrator Access Code and your OneCloud login credentials or extension number. ...OneCloud Connect: V2.0 Release Notes
New Features Camera and Mic checks before joining a meeting Test Mic play playback Auto-knock new guests Allow customization of in meeting UI Random meeting room ID Show past meeting participants OneCloud status updates Dark Mode and Light Mode ...OneCloud Basic Portal User Guide
Accessing the Portal You will first need to complete setting up your account using the Welcome Email sent to you by either the onsite installer or TelWare support team. Once set up, you can access your account by navigating to Myonecloud.com. Home ...OneCloud: OneCloud for Salesforce User Guide
Logging In Click on the OneCloud tray tab within Salesforce. A login option should appear. Use your OneCloud credentials to log in. Some users might see the following error when logging in for the first time. Please attempt to login again. If the ...